Welcome back to my Christmas Pudding Chronicles! I'm an outsider dabbling in the British tradition of making figgy pudding. I hope you enjoy reading about my experience and maybe even get inspired to join in! Traditionally, the preparations for the Christmas pudding begin on the five Sundays before Christmas, but if you want to join later, that's perfectly fine. You can even steam and light it up the same day. If you've read my previous post about soaking fruits, it's worth checking out! Otherwise, we'll be "cake battering" once a week, adding a bit of brandy until it's time. But today, let's focus on the important day. It's a hot day.
Christmas pudding is a steamed cake and is made on the five Sundays before Christmas, starting from the Sunday after Thanksgiving. So, if you start now, you're exactly on time! Known as stirring Sunday. This is the day to mix all the ingredients together and while mixing, make a wish. You can put clean toys in the batter to find a lucky person on Christmas Day, or you can skip it, like me. I don't want any surprises in my cake, thank you! After that, you steam the pudding for five hours. I know it takes a while, but choose a day when you'll be in the kitchen most of the time, and time will fly by.
Ingredients and Precautions
By the way, in case you didn't know, I follow Nigella Lawson's recipe as a guide. I've made a few small adjustments, which I'll explain later.
Here are the ingredients I used:
- A0n0m000001
- A0n0m000002
- A0n0m000003
- A0n0m000004
- A0n0m000005
- A0n0m000006
- A0n0m000007
- A0n0m000008
- A0n0m000009
- A0n0m000010
- A0n0m000011
- A0n0m000012
- A0n0m000013
- A0n0m000014
- A0n0m000015
This Christmas pudding experience gave me a sneak peek into my recipe-making process. I follow Nigella's recipe, but I've also read through many other recipes to compare the equipment used for steaming, the pudding's packing method, and the chosen ingredients, leaving out or adding some. When the time is right, I use all these delicious morsels to decide what I'll add to the pudding.
The first change I made was to my dried fruits. Last week, I wrote about soaking fruits, and I almost followed the recipe to the T. However, a few days later, I stumbled upon some recipes that suggested adding candied orange peels. I love candied oranges! So, instead of feeling like I was missing out on zesty fruits, I bought some, weighed 50 grams of soaked fruits, and replaced them with my new snack. This is my choice, but you can stick with the original recipe. You can use candied cherries, apricots, or something else instead. Some people also like to add nuts to their pudding. As long as you have about 4 cups of chopped dried fruits and maybe some nuts, you're good to go. (Right? No, it doesn't matter.)

Besides a few quick substitutions (like swapping brown sugar for the darker brown sugar in Nigella's recipe), I only had to deal with fresh breadcrumbs and butter. Fresh breadcrumbs isn't a term I hear often, but it simply means making breadcrumbs yourself from bread, instead of buying the pre-made stuff from the store. I used about five and a half slices of soft sandwich bread – the kind with a light texture – and toasted, dried, and then ground them into crumbs. You can let the bread dry over night, or you can dry it in the oven.
Then comes the suet. It's a fat derived from different animals, so its availability may vary depending on the region. Nigella's recipe, and many others, use rendered beef suet. It's widely available in the UK, but not so much in the US. I searched online to see where I could buy grated butter and accidentally ordered beef tallow. Beef tallow is the fat derived from beef suet.
Some recipes use vegetable suet, others use butter, and still others use a combination of grated butter and beef fat. I chose to use half-grated butter and half-beef tallow. I wished I could still grind the beef tallow into butter, and I also hoped to extract some valuable beef from it. Apart from that, I think you can use any saturated fat, and if you can grind it into butter, even better. I have to admit, the butter was a bit sharp. No beef, just fat. It was all right, but not fantastic. We'll see if the smell sticks around after five weeks. Keep that in mind when choosing the fat.
Making the Pudding

I had such a blast making the pudding! It's like a mix of cake baking and hash brown baking. The best part is that you can change the recipe and add whatever you like, as long as you mix it after each recipe. My baking routine begins with mixing the dry ingredients. I combine flour, spices, and breadcrumbs with the semolina and put it in the bowl. Then I add brown sugar to the mixed fruits. I grabbed a large bowl and mixed up the eggs, Fuji apples, lemon zest, and honey. I added the fat for mixing, mixed, and then added the fruit mixture. I added the dry mix and mixed again. There are so many cakes and dishes that require mixing, folding, or stirring. That's what makes mixing such a treat, because I never feel like I'm doing it wrong. While mixing, I also made some wishes (which is part of Sunday Stirring). Then I was ready to go.
Preparing the Bowls and Pots
I needed:
- A0n0m0000019
- A0n0m0000020
- A0n0m0000021
- A0n0m0000022
- A0n0m0000023
I greased a 6-cup glass bowl with butter and cut a small circle of parchment paper to place on the bottom. I read that it helps prevent the pudding from sticking to the bowl once it's done. I don't want my hash brown cake to stick to the bowl! I scooped the mixture into the greased bowl, pressed out any air, and smoothed the top. In a blog, it was mentioned that you should push your fingers around the edge to "seal" it. So, I did that too. The pudding looks prettier that way, too. Then I covered it with another circle of parchment paper.
The nerve-wracking part is coming up. You need to cover the pudding well, but still let it expand to create steam inside. If it's not covered well, condensed water can drip into the pudding, creating a sticky mess. That's why I learned how to fold parchment paper and foil with a crease in the middle to allow for expansion. Who would have thought I'd be doing that this year?
Cut out a piece of foil. Lay the parchment paper face down on top of it. Cut the parchment paper so it's about half an inch smaller than the foil on all sides, but make sure it's at least 2-1/2 inches wider than the top of the bowl. The excess can be trimmed later.
Fold the parchment paper with your fingers. Image source: Allie Chanthorn Reinmann Fold the edges of the foil and the parchment paper together. You now have a fold to allow steam to escape, but prevent the sealing from being damaged. Turn the paper over so the parchment side is facing down and place it on the pudding bowl. Carefully press the parchment paper against the bowl to organize it. If you like, you can make a handle out of more kitchen twine. This is optional, but it can be helpful while pulling out the hot bowl later.
Secure the bowl using kitchen twine. Wrap the twine around the bowl twice and tie it. Now you can cut away the excess parchment paper and foil, leaving about an inch around the bowl. Place a piece of parchment paper under it, press against the bowl, and organize it. If you like, you can make a handle out of more kitchen twine and attach it. But make sure the main string isn't weakened. This is handy when you need to remove the hot bowl later.
Steam the Pudding
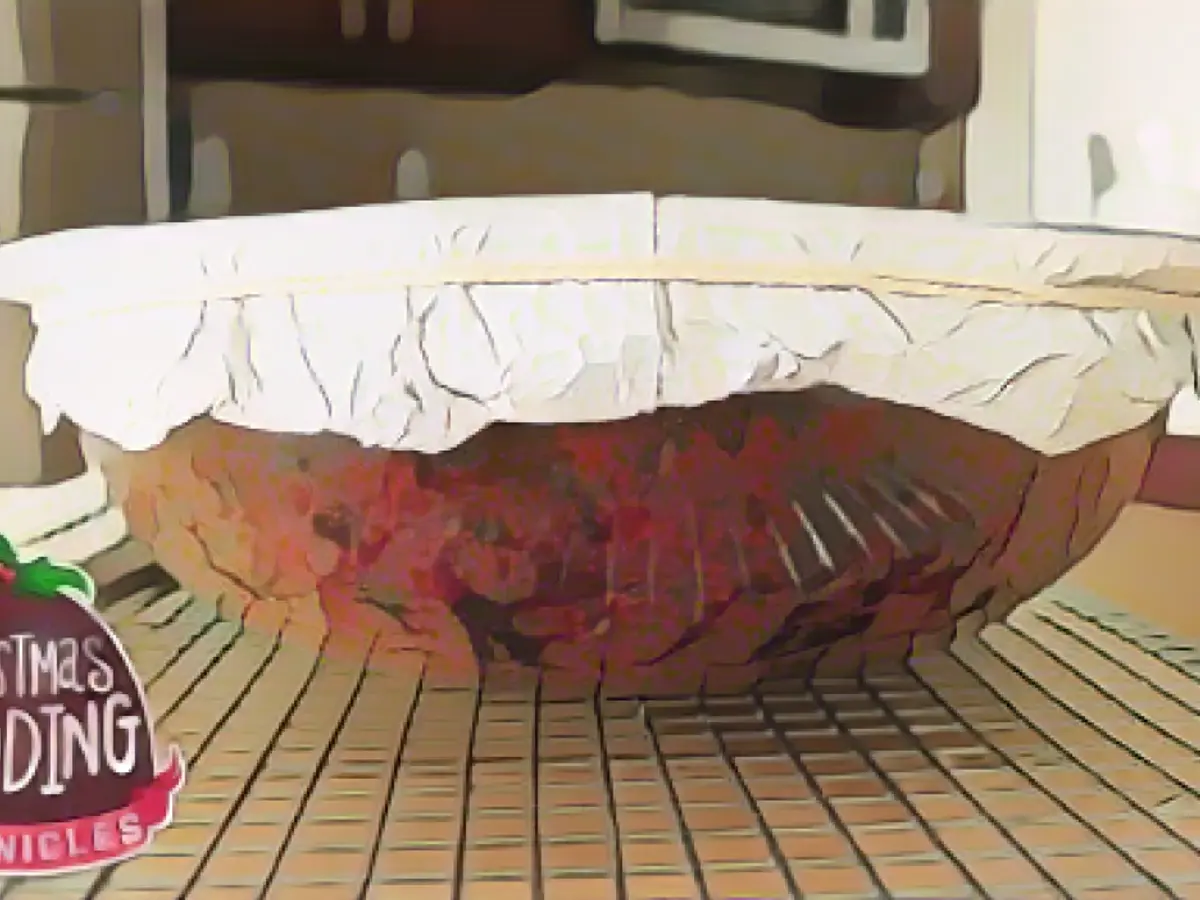
To steam the pudding, you need a layer at the bottom of the pot to prevent the bowl from touching the heat directly. This can be a steamer, if you have a small one. Keep in mind that the steamer lid must be tight when you add the pudding. Since I didn't have a small steamer, I used a ring from a Mason jar lid. Place the pudding on a steamer ring or in a pot, and pour boiling water into the pot so it comes up to about 2-1/2 inches or halfway up the side of the bowl. Try not to let the water stream touch the aluminum foil lid.

Of course, the first thing I did was immediately pour water over my foil lid. That's not good. Thankfully, my lid was tight enough, so I just wiped it clean and carefully poured hot water into the pot. I set the lid on and turned on the heat. I started at medium heat and waited about five minutes until I heard it boil. Then I turned the heat down to simmer. I want it to slowly simmer, but still simmer. As long as it's boiling, that's good. I set a timer for five hours and got to work.

I pour water from a water kettle into my steaming pot. Image source: Allie Chanthorn Reinmann Now all that's missing is a lid. Keep in mind that the pot shouldn't be dry while simmering. After an hour, I take off the lid and check if water needs to be added. If you have a tight lid, you might only need to add water once or twice. My lid is loose. I can see steam escaping around the edges. I fill up the water kettle and add water as needed every hour.
Once the time is up, I turn off the heat, take out the pudding, and let it cool on a cake rack. There's no real way to tell if the pudding is done. Don't open the lid, because it's hard to get it back on if more time is needed. Honestly, if it's not done within five hours, something isn't right with the cake. And more time won't fix it.

The finished pudding has risen, slides easily from the bowl, and isn't soggy. Image source: Allie Chanthorn Reinmann After about 20 minutes of cooling, I cut the string and remove the lid. It smells like someone just opened the door to my gingerbread bakery. (Well, it does!) All the doubts I had about the cake's appearance, its sharp taste from the beef fat, and the need for a folding costume have disappeared. I'm thrilled with the success of this cake. I wrapped it in plastic wrap and stored it in the microwave. (Yes, the microwave is sometimes used for storage in New York.) Now I just need to feed it brandy every week and hope for the best next week.
Season's greetings and happy baking! If you're curious about how to steam a Christmas pudding, you can find recipes and tips online and adapt them to your taste.
Source:
Enrichment Data: Steaming a traditional British Christmas pudding involves several steps and specific ingredients. Here's a step-by-step guide:
Ingredients:
- Dried Fruit: Raisins, currants, and other dried fruits
- Suet: Traditionally used, but some recipes may use vegetable suet
- Breadcrumbs: Often used in combination with flour
- Flour: Wheat flour
- Eggs: Whole eggs or egg yolks
- Spices: Nutmeg, cinnamon, ginger, and cloves
- Liquid: Milk, fortified wine (such as sherry or brandy), and sometimes citrus juice
- Dark Sugars and Black Treacle: For the rich, dark color and flavor
- Alcohol (optional): Brandy, sherry, or other spirits for soaking the pudding
Step-by-Step Instructions:
- Prepare the Pudding Mixture:
- Combine dried fruits, suet, breadcrumbs, flour, eggs, spices, and liquid in a large mixing bowl. Mix well until all ingredients are fully incorporated.
- Add dark sugars and black treacle to the mixture and stir until well combined.
- Add Liquor (Optional):
- If using, pour a small amount of liquor (such as brandy) over the mixture to moisten it.
- Transfer to a Basin:
- Transfer the pudding mixture into a greased basin or pudding mold. Make sure the basin is large enough to hold the mixture and has a lid or foil to cover it.
- Cover and Secure:
- Cover the basin with a sheet of parchment paper or aluminum foil, ensuring it is tightly sealed. Some recipes also use an elastic band to secure the foil.
- Steam the Pudding:
- Place the basin in a large pot filled with water to about halfway up the side of the basin. Add a plate or trivet to the bottom of the pot to prevent the pudding from coming into contact with the water.
- Cover the pot with a lid and bring the water to a boil.
- Once boiling, reduce the heat to a simmer and steam the pudding for several hours, typically 2-3 hours, depending on the recipe and desired consistency.
- Check for Doneness:
- Insert a toothpick into the center of the pudding. If it comes out clean, the pudding is done. If not, continue steaming for another 30 minutes and check again.
- Cool and Store:
- Once the pudding is cooked, remove it from the pot and let it cool slightly.
- Traditionally, Christmas puddings are allowed to mature for several weeks before being reheated and served. If not maturing, it can be reheated by steaming again before serving.
- Serve:
- To serve, reheat the pudding by steaming it for about an hour.
- Traditionally, the pudding is dressed with warm brandy, set alight, and served with hard sauce (such as brandy butter or rum butter), cream, lemon cream, ice cream, custard, or sweetened béchamel. It can also be sprinkled with caster sugar[1].
Additional Tips:
- Maturing the Pudding: If you have time, allow the pudding to mature for several weeks. This enhances the flavors and textures of the pudding.
- Reheating: When reheating, make sure the pudding is steamed gently to avoid burning the exterior before the interior is fully heated.
By following these steps and using traditional ingredients, you can create a rich and flavorful Christmas pudding that is a staple of British holiday traditions.


